The use of iPads in the classroom for improving teaching and learning has proved to dramatically impact education. For teachers, it is essential to have the knowledge and confidence to use this tool in front of your students. Here are 5 useful iPad Tips for teachers to navigate your iPad.
1. Create folders on iPad
Folders will help you to organize Apps and it also makes it easy for students to find the resources. In order to create a new folder on your iPad, you just need to tap and hold on an App until all the Apps on the screen start to jiggle, then drag the App over another icon and release. A new fold with both Apps will be created on your iPad and the folder will be automatically named according to the category of the apps it contains, but you can rename it by click on the title.
2. Take Screenshots on iPad
For teachers screenshots are incredibly useful to share the iPad screens. With your iPad, you can take a screenshot of a website, app, existing photo, etc. by pressing and holding both the Home and Sleep/Wake button together. You will see the screen flash and the device will make a camera clicking sound, indicating that a photo has been taken. The screen shots will be placed in your Photos gallery and you can send or share it by email or iCloud.
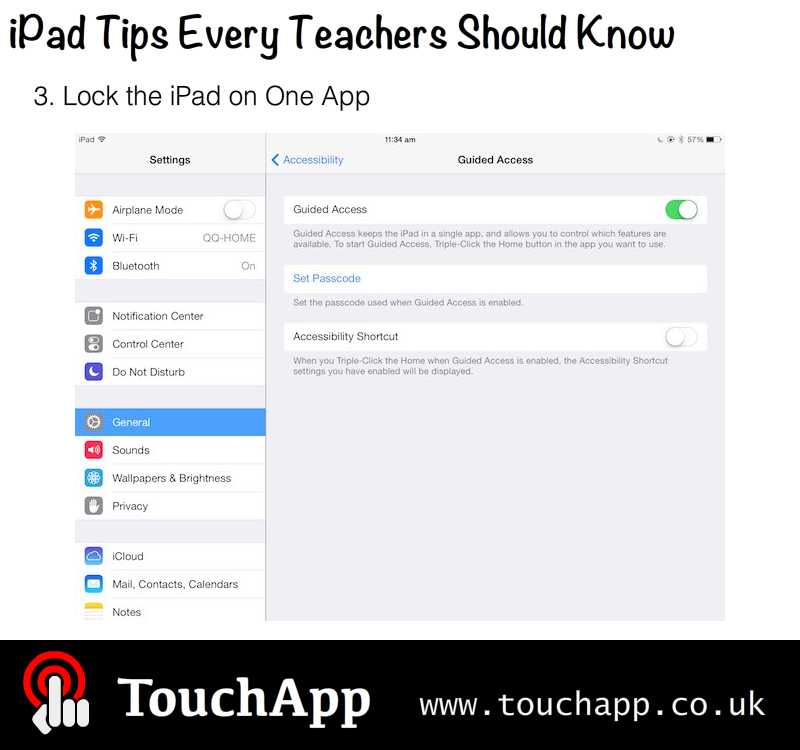
3. Lock the iPad on One App
For younger students, special education classrooms and even your own kids, Guided Access is great for locking the iPad on a specific app of your choice. To turn on Guided Access, go to Settings > General > Accessibility > Guided Access and flip the switch to turn it green. You need to choose a passcode and confirm it by re-entry. Then you need to open the app you want and initiate Guided Access by triple clicking the home button. Then tap Start at the top right corner and the iPad will be locked to the App. The students can’t leave the App by pressing the home button, the power button, or swiping with multitasking gestures. To end Guided Access, you need to triple click the Home button, enter the passcode and then tap End in the top left hand of the screen. However, restart iPad by pressing and holding the power and the home button together will end Guided Access as well.
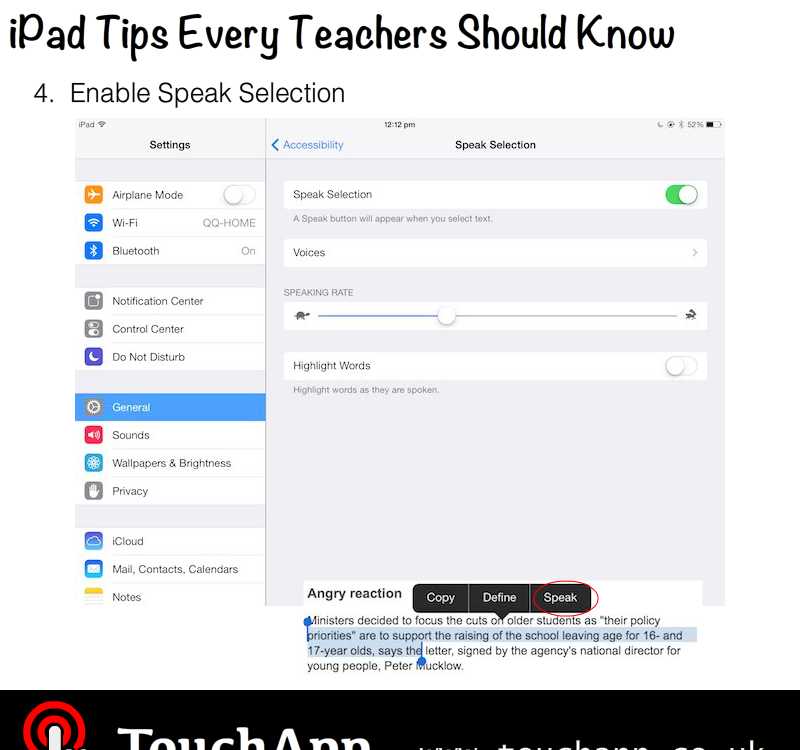
4. Enable Speak Selection
The reading text function of iPad can be a great support for struggling readers. You can turn on Speak Selection by going to Settings > General > Accessibility > Speak Selection and flipping the switch to turn it green. You can also adjust the speaking rate and select whether you want the iPad to highlight the word when it is reading. iPad can read text from Safari, Notes, iBooks or other Speak Selection allowed apps. To read the text, you need to select the text by pressing and holding on the first word you want to read. Once the magnifying glass appears, pull the blue bars on to select the amount of text you want to read, then tap Speak in the black pop-up menu above your selected text.
5. Make an iPad backup
As a teacher, it is always wise to back your iPad’s data and you can use either iTunes or iCloud to back up your iPad. For iTunes, you need to connect your iPad to your Mac or PC, open up iTunes and right-click the iPad in the Devices list and select Back up. For iCloud back up, you just need to go to Settings > iClound > Storage & Backup, tap Backup Now at the bottom of the list and then your iPad will start immediate backing up. You can also flipping the switch of iCould Backup to green to allow automatically backing up.
There are also many other tips for iPad teachers, and some we have already covered before such as “Display or Mirror your iPad screen on an external TV, projector, or display”, “how to transfer files from a computer to iPad” etc. And we will keep you update for the latest iPad tips.
Follow us on Twitter: @TouchApp_uk
From Mobile App development company TouchApp
![]()